![]()
![]()
![]()
![]()

![]()
![]()
![]()
![]()
![]()
![]()
![]()
![]()
![]()
![]()
![]()
Creating
immersive panoramas :
a "cookbook" approach
-Part
2-
3.- Locating the control points.
Panorama Tools requires that you provide it with the pixel coordinates of "a sufficient number" of couples of matching points for each pair of images. PTools uses these coordinates to estimate the pitch/yaw/roll angle of each images with respect to the first one - the anchor image - and the value of the parameters needed to make the stitching such as the horizontal field of view of the lens and its distortion. Practically for this setup you will need 4 couples of points for each seam to determine enough parameters to get a reasonable fit.
The control points should be chosen to be easily identifiable in each image of a pair, such as corners of windows or frames, small pebbles, flowers in grass, or extremities of tree branches (take care of moving objects ! wind may play bad tricks...). Try to spread them as much as possible in the overlap region.
I first identify the spots that I will use with colored arrows placed on the layer added during step 2. The zoom factor must be low enough to have a full overview of the seam on both photos, placed side to side.
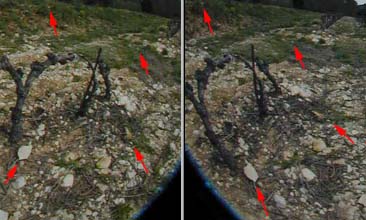
This identification step is not strictly necessary, but it helps to verify the coordinates if something goes wrong, and to avoid to mistake a pebble for another when zooming closer to be more precise.
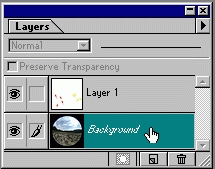
When this step is finished, click on the background layer in the layer palette to select it, then save the three files in Photoshop format. It is very important to select background before assembling the panorama : Panorama Tools considers only the active layer which must contain the image... and not colored arrows !
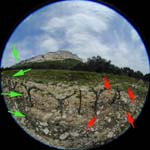
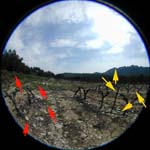
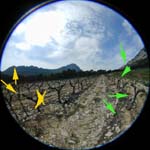
Final result of this step - arrows oversized to be visible on thumbnails
4.-
Writing the script file.
We are here at the heart of the process, the most tedious - and error prone - step. First, open the empty script with a text editor (Notepad will be fine). Some details on its structure (see Panorama Tools documentation for more details) :
p w2400 |
Generate a panorama of width 2400 (and of height 1200), matching approximately the resolution of the original images |
i w1158 h1158 f2 r0 p0 y60 v185 a0 b0.1 c0 i w1158 h1158 f2 r0 p0 y180 v=0 a=0 b=0 c=0 i w1158 h1158 f2 r0 p0 y300 v=0 a=0 b=0 c=0 |
Insert three images, fisheye full frame type (f2), resolution 1158x1158 (w1158 h1158). The roll and pith angle of each image is initially set to 0 (r0 p0) while the yaw angles are set to 60°, 180° and 300° (y60, y180, y300). These yaw values were chosen so that no seam is located near the edge of the generated image. Fine tuning the seams will thus be easier. The field of view of the lens is preset to 185° (v185) while its distortions are corrected by these parameters : a0 b0.1 c0. The lens characteristics are same in the other two photographs (v=0, a=0 b=0 c=0). |
v v0 b0 r1 y1 p1 r2 y2 p2 |
Panorama Tools will optimize these parameters : - lens field of view (v0) and distortion (b0). At first I thought I should determine these value once for all and copy these parameters in all my script files, but it seems to be better to give the optimizer some degree of freedom. That's why I let the optimizer compute these values - and get different results each time ! - roll, pitch and yaw angles of images n°1 and n°2. The first image (n°0) is the anchor point for these estimations. It is very important that the roll and pitch estimations given for the the first image (r and p parameters in the first i-line above) be exact. If in the generated panorama the sky-line is wavy or the vertical lines are not vertical, then you should try to estimate the real roll and pitch of this image and modify the r and p value, run the optimizer and re-assemble the panorama... |
c n0
N1 x y X Y c n1 N2 x y X Y c n2 N0 x y X Y |
You have to give the pixel coordinates of the control points in each pair of images. Each line contains the coordinates of the same point in the first image (x y) and in the second one (X Y). Take care of the order of the images in the coordinates
: |
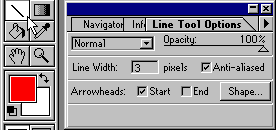
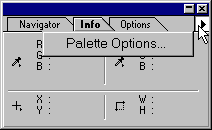
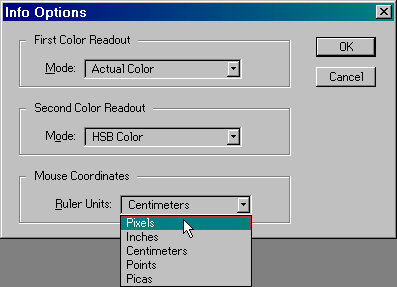
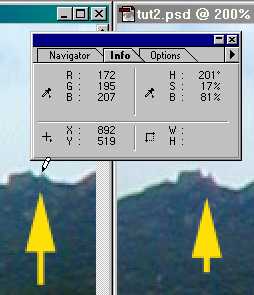
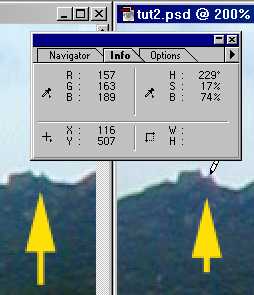
To read the coordinates of the points, use the info palette of Photoshop. First, set the unit of the mouse coordinates to pixels (palette options, units = pixels).
Open a pair of images, zoom them to 200% (press Ctrl + a few times) and place them side to side. Select the first image and place the tool tip (here the pencil) over a control point. Read the x/y value, then go to the second image and get the X/Y value of the same control point. The c-line of the example below will be : c n0 N1 x892 y519 X116 Y507
Now it's simple : just repeat this process for each control point of each image pair... Your script should look like this. Save it !
To pan around an image, maintain the space bar pressed (the cursor will change to a hand) and drag the image with the mouse. You can either fill the script by switching at each point between Photoshop and Notepad, or jot down all the coordinates first on a paper, then enter them in the script. But the fastest method is to dictate the numbers to a friend on another computer... |
![]()
![]()
![]()
![]()
![]()
![]()
![]()
![]()
![]()
![]()
![]()
![]()
![]()
![]()
![]()