![]()
![]()
![]()
![]()

![]()
![]()
![]()
![]()
![]()
![]()
![]()
![]()
![]()
![]()
![]()
Panoramic lampshade
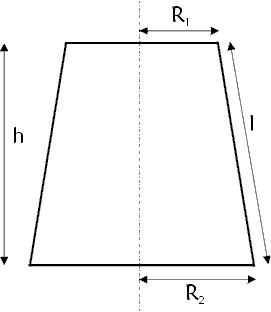
- R1 = upper radius
- R2 = lower radius
- l = width of paper band
- h = height of lampshade. h is not needed,
l is generally easier to measure than
h, but l could be obtained from
l = Sqrt((R2-R1)2+h2) - R = radius
- A = pattern top angle
- B = hfov of generated fisheye image
- L = image dimension
- H = "useful" height
- S = shift value
- dpi = resolution (dots per inch for dimensions measured in inches, dots per cm for dimensions measured in cm)
- X = image horizontal size (pixels)
- Y = image vertical size (pixels)
- Vx = image horizontal field of vision = 360°
- Vy = image vertical field of vision
- Panorama Tools plugin for Photoshop, properly installed
- Any Photoshop plug-in compatible image editor. I used Photoshop 5, and will continue the explanations with it
- Open your panoramic image with Photoshop
- If needed, crop it vertically to Y value calculated above (Image / Canvas size, set vertical size to Y)
- Scale it vertically by a factor p / 2 (157%): Image / Image size, check Resample and uncheck Proportional scaling, Vertical scale = 157%
- Launch Panorama Tools : Filters / Panorama Tools / Adjust
- Check "Extract" and "Use options"
- Click "prefs" button and choose option b. Type in a file name and press OK
- Click "Set" button and enter values you calculated
in previous step and set options as shown below:
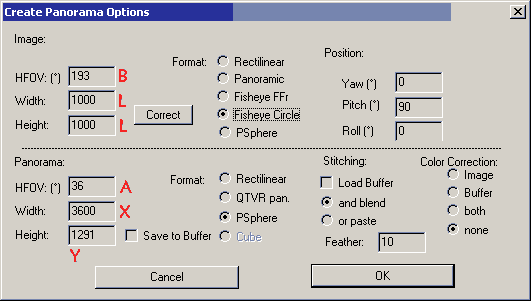
- Click OK, wait for completion and open generated image
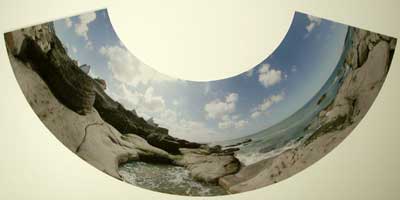
- All you have to do now is to print your lampshade and assemble it...
- Set "Image Height" to H value instead of L
- Click on "Correct" button
- Check "Vertical shift", then click "Options" button
- Enter (negative) shift value S in all three boxes.
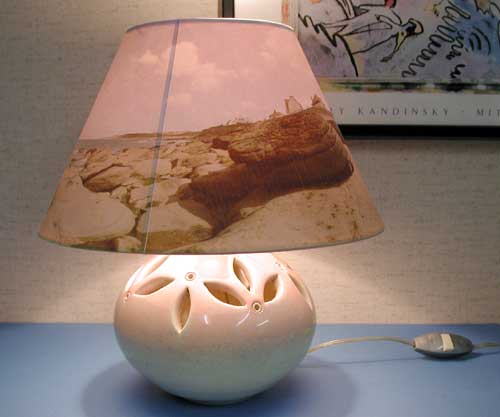
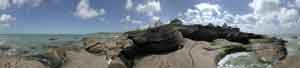
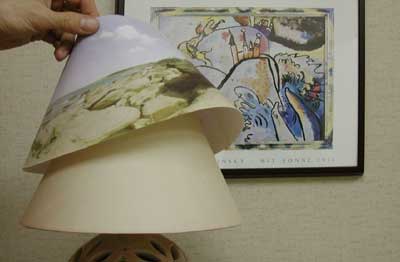
A few months ago, François Mercat and Vincent Audouard asked me if I knew a method to transform a panorama for printing on a conical lampshade like the one shown above. I fiddled some time with Panorama Tools and came up with the method below. It is based on equirectangular projection to fisheye image conversion available in Panorama Tools plugin for Photoshop.
For another example of panoramic lampshades, see bottom of this page created by Andrew Davidhazy (and don't miss somany other interesting things on his site !).
Parameters definition and preliminary calculations:
Here is
an Excel sheet to perform these calculations
|
Lampshade parameters: To get a better radius precision, measure diameter in two orthogonal distances, add them and divide by 4. This prevents problems with slightly flattened lampshade frames. |
|
Pattern parameters Generated image parameters R2
R = l ---------
(R2-R1)
360.(R2-R1)
A = ----------
l
L = 2.R.dpi
R2
B = 360 -------
(R2+R1)
H = L/2 * (1 - R1/R2 * cos(A/2))
(valid only if A<180°) S = -(L-H)/2 |
X |
You must crop vertically your image to: l
Y = X --------
p(R2+R1)
Vfov of your image must be at least: l
Vy = 360 --------
p (R2+R1)
This implies, for standard shape lampshades,
rather high vfov and wide angle lens when shooting
panorama (28 mm lens portrait mode is barely enough.) |

Image
remapping
You will need:
Proceeding:
If your lampshade has a small conicity (R1 almost equal to R2)
Size of generated image can be very huge... Though memory price is fairly low nowadays, any trick that can reduce this size can be useful ! In this case, in "Panorama options" dialog box,
CAUTION: Values entered in Correct dialog box are remembered between Panorama Tools sessions, and nothing reminds you in "Panorama options" dialog box that a correction is active. Thus it is wise after generation of your lamp shade to re-open "Correct options" screen and uncheck "Vertical shift". You will avoid painful surprise next time...
Printing your lampshade
If you can afford it the best solution is to have it printed in one piece on a wide printer, you will have only one seam.
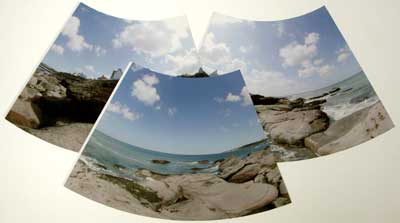
For the example shown above, I simply split the image in three parts that I printed on thin coated paper, A4 size. After assembly, I lay this as a cover on a white lampshade. I can then change panorama with minimal job and cost !
![]()
![]()
![]()
![]()
![]()
![]()
![]()
![]()
![]()
![]()
![]()
![]()
![]()
![]()
![]()