![]()
![]()
![]()
![]()

![]()
![]()
![]()
![]()
![]()
![]()
![]()
![]()
![]()
![]()
![]()
- If it is not already done, download and install SnapCAD.
- Download the archive snldcad.zip. Open it and place the "LDCad" folder that it contains in your SnapCAD folder. This archive contains connectivity information (in LDCad\SnapcadShadow.csl) and definition of VEX flexible parts: rubber bands, smart cables, chains and ropes (in folders "donors" and "templates").
- Download and install LDCad (this tutorial shows screens from version 1.5 alpha 2).
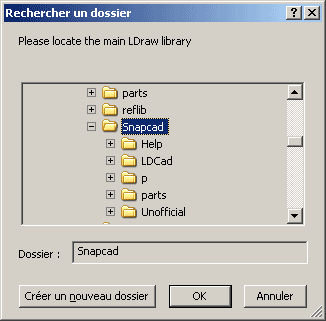
- After accepting LDCad license, LDCad asks for LDraw library. Select your Snapcad folder.
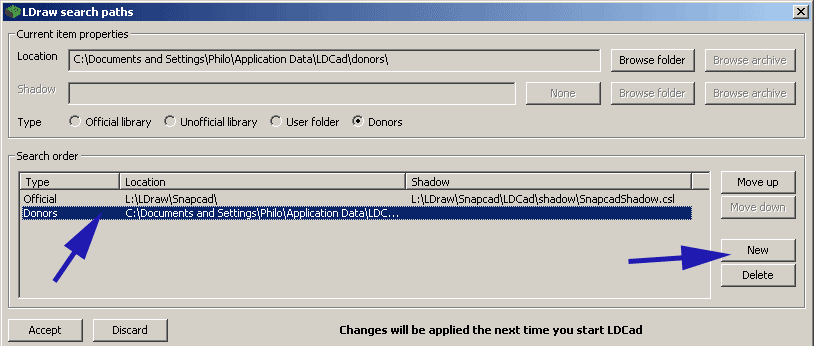
- After LDCad is fully started, we need to go on to configure connectivity. In the menu bar, choose Prefs -> LDraw -> Search (library) paths.. In the window that opens, location of SnapCAD library should be OK, but "shadow" library (a file containing connectivity information) points to the internal LDCad shadow library. Press the "Browse archive" button and navigate to (snapcad folder)\LDCad\shadow\SnapcadShadow.csl.

- We also need to configure the "Donors" folder to use the one prepared for Snapcad. Donors are special LDraw files that contain drawing information used to generate flexible parts such as smart cables. Click on the second line that shows default LDCad donors location (we still need them), then press "New" button.
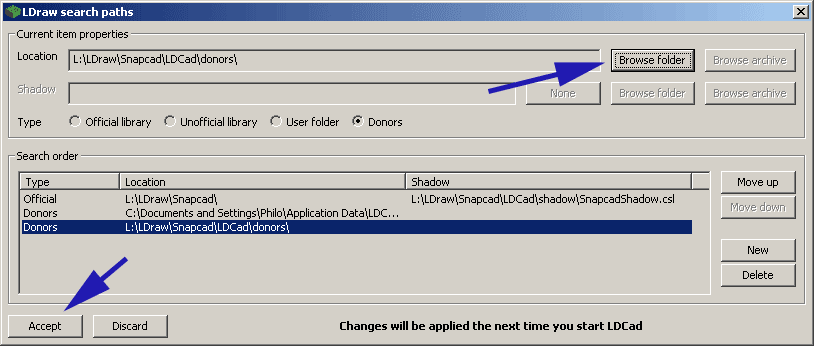
- Now press the "Browse folder" button and navigate to (snapcad folder)\LDCad\donors\. When you are done, press "Accept" button.
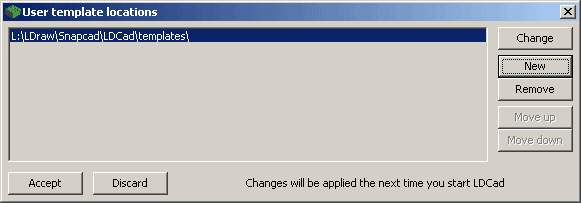
- Now, we need to specify the location the templates that define all flexible parts. In the menu bar, choose Prefs -> LDraw -> User templates.. Press "New" button and browse to (snapcad folder)\LDCad\templates\. When you are done, press "Accept" button.
- Optionally, you can disable interpolated colors to get only defined VEX colors: set "Prefs -> LDraw -> Calculate missing dithered" and "Prefs -> LDraw -> Calculate missing transparent" to disabled state.
- All these configurations are activated only after a restart of LDCad. So close now LDCad, the next steps (parts bins configuration) need to be done with LDCad shut down.
- Download archive onlyvexpartbin.zip and open it.
- Place its content (folder "partBin") at location %appdata%\LDCad
- You may now start again LDCad. The part bins should now display VEX parts icon in the first bin, and when you click on it you get the standard SnapCAD categories, plus one containing the flexible parts and one showing the old versions of parts.
Using
LDCad LDraw editor with SnapCAD Parts
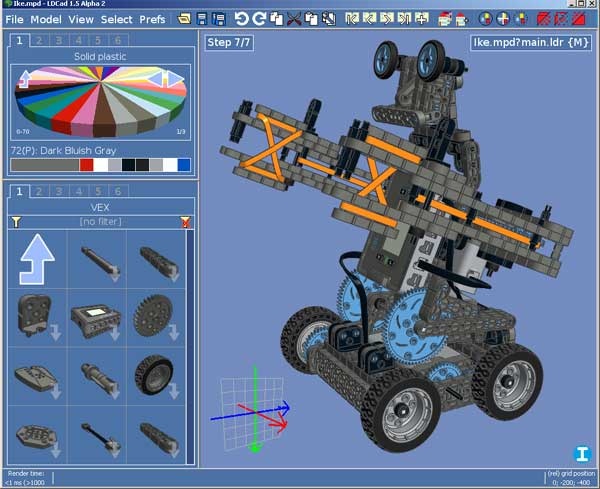
SnapCAD is a great tool to create VEX IQ models, with great features (progressive learning curve, possibility to run on very low end machines...). But for more advanced usages, LDCad may be an interesting choice: among other benefits it provides parts snapping (parts properly assemble when moved "close enough"), superior image quality, and a wonderful tool to generate flexible parts such as rubber bands or electric cables (see image above). The price to pay is a slightly more intimidating user interface, and a bit steeper learning curve. It also needs a better PC.
The good thing is that it doesn't need to be a definitive choice: files created by SnapCAD and LDCad are fully compatible with both programs.
This page is by no mean a tutorial on LDCad usage, only a description of the configuration of LDCad to use SnapCAD library on a Windows system (I guess you will need some adaptation on a Linux box...). You will find LDCad documentation here.
If you need only SnapCAD VEX parts
If you only need to work with SnapCAD VEX parts, it is not required to install the LDraw library.
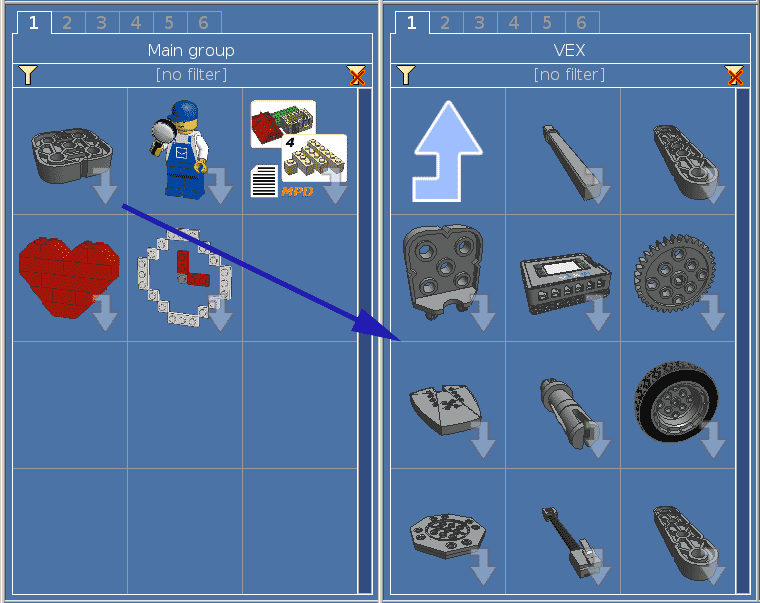
We will now change the part bins to display the various categories of VEX parts. LDCad doesn't offer (yet) user installable part bins configuration, so we need to change some of its default files. In this version of configuration we choose to display only VEX parts so I changed the root bin to display only VEX parts and useful special bins (submodels, search, favorite and recently used.
Now... enjoy the power of LDCad!!!
Note that parts bin configuration will need to be done again if you install a new LDCad version.
![]()
![]()
![]()
![]()
![]()
![]()
![]()
![]()
![]()
![]()
![]()
![]()
![]()
![]()
![]()