|
||||||||||||||||||||||||||
Hiding the Tripod by Ronny D'Hoore This is part of a series of documents that
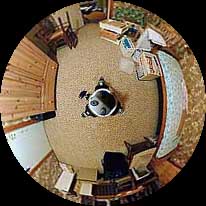
provide additional information on Everyone who has made "fully immersive" (360 x 180 degree) panorama spheres knows the problem: when you pan down in the viewer, you see the tripod.
There are at least two ways to do something about this. The first is to manually edit the image in a graphics editing program. Adobe PhotoShop's rubber stamp tool is great for this purpose. But it requires quite some effort to do to nicely, and not all backgrounds lend themselves to editing. Another solution is to insert a logo, or sometimes called a tripod cap. You simply paste your logo (in a circular form) over the very bottom of the spherical panorama. This method is more suitable if you need to produce many panoramas.
Now, in both cases, you need to somehow get the floor frame into PhotoShop (or whichever graphics program you use). PhotoVista (Live Picture's first class stitching program) actually provides a way to export the viewing window to a BMP (Windows bitmap) file, and later import the edited version again. However:
So, we'd better use Helmut's tools. In his Frequently Asked Questions, Helmut gives a hint towards the solution:
However, we don't want to edit the zenith, we want to edit the nadir. Now, you may try to do the opposite of what he describes, and take the lower half of your spherical panorama, and convert it to Fisheye Vertical format, but you won't get anywhere that way. The trick is to first rotate your image 180 degrees. Then the same steps apply. Then at the end, simply rotate it one more time. So, hackers know enough now, but for the others, here comes a detailed explanation of exactly what to do to insert a logo, with plenty of pictures. I'm using PhotoShop and Windows. If you use something else, you should not be having much trouble to convert my procedure for your platform, as long as you have the Panorama Tools plug-in installed in a suitable graphic program. If you want to edit away the tripod instead of using a logo, the process is quite the same, except that you start at step 5, and in step 11 you edit the image instead of pasting the logo. Open your logo in PhotoShop (File > Open). It should be
about 260 x 260 pixels big, and be either a PhotoShop file (.PSD)
with the corners around the logo made transparent, or a GIF
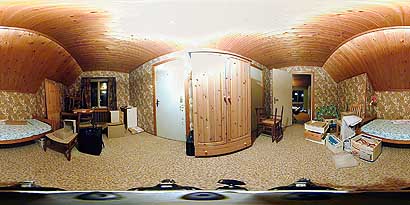
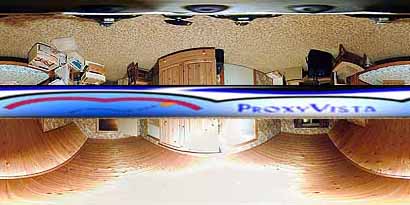
file with transparent corners. An example: Select the whole image (Ctrl-A) and copy it to the clipboard (Ctrl-C). Close the file. Open your panorama (PSphere). Your tripod will be smeared
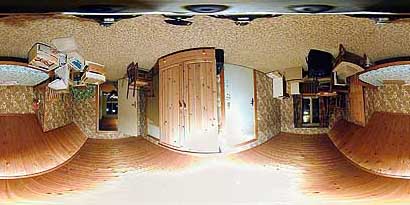
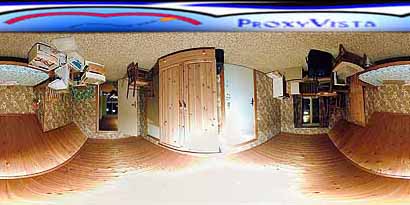
along the bottom. Rotate the image 180 degrees (Image > Rotate Canvas >
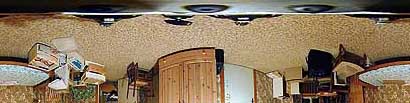
180°). Now your tripod hangs on top. Remove the bottom half of the image: Image > Canvas Size.
For "Height", type 50 and select "Percent".
For Anchor, select the top middle tile. Click OK. You end up
with the top half: Remap it to a vertical fisheye image: Filter > Panorama
Tools > Remap.
You will also see the result (or at least a slice of it) in Photoshop. But we don't need that one. So, undo the last two steps (which is done in the history window), so that you recover the full (rotated) panorama as in step 4. Now open the result of the remap operation (File > Open).(The
file name you provided will have gotten a number appended.)
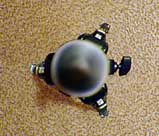
The result is a cute top view of your tripod! Now paste your logo in the center of the image (Ctrl-V).
Merge the new layer in the background picture (Layer > Merge
Down). Next, convert it back to PSphere: Filter > Panorama Tools
> Remap.
Close the useless file (without saving) and open the actual
result. ( Take the file name with the next number.) So now your
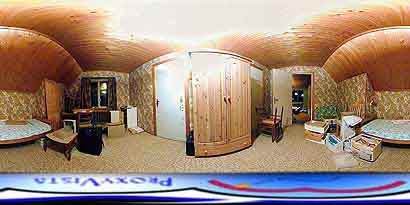
logo is smeared on the top, instead of your tripod. However,
the image size has changed, so we have to resize this image
to match our original image. So do "Image > Image Size",
make sure "Constrain Proportions" is enabled, and
either correct the width (use the width of the original panorama
in pixels), or type 63.68 percent. Don't worry about image degradation.
The logo, although eventually just a small thing sitting on
the floor, occupies a lot of space compared to the rest of the
panorama, and will be crystal clear. Now, in order not to degrade the quality of our original
panorama, we will paste as little of this new image (which has
been transformed thrice, and is thus of inferior quality) as
really necessary. That means, only the part with the logo. Therefore,
we will remove the bottom part and keep only the part where
the logo is. Do "Image > Canvas Size", and type
33 percent. For Anchor, again select the middle top tile.(If
your logo was bigger than I expected, do "Edit > Undo"
and try it again with a bigger percentage.) Select the whole image (Ctrl-A) and copy it to the clipboard. Then close the image without saving. Now paste it in the original panorama (Ctrl-V). It will end
up in the middle: To get it to the top quickly and neatly, use the following
trick: select the whole image (Ctrl-A) and do Layer > Align
to Selection > Top. The logo will move to the top left corner
of the image. Then remove the selection (click anywhere in the
image with the marquee tool), and flatten the image (Layer >
Merge Down). Finally, rotate the image back (Image > Rotate Canvas
> 180°) and save it. You're done! When you load the image in a viewer, and pan down, the logo will smile at you. Note: Another (quick-and-dirty) method to generate a tripod cap in a panorama is to simply put a colored band in the bottom of your image and add your title/copyright at the top of the band in wide lettering. It won't look fancy, but it's fast! Copyright © 2000 ProxyVista AB
|